CONSTRUCTION PLAN / 01
Five creases.
Four joins.
Keep this sheet beside your paper. The matching letters tell you where every face meets the side strips.
Back to the making steps ↗Start flat
One strip · 120 × 100 mm
Five dashed folds · six panels
Glue on the reverse
Green areas = 8 × 60 mm.
Printed labels face outwards.
Alternate folds to make a zigzag, then match the other strip to its mirror as seen from above. Both A ends are at the front; printed labels face outwards. Face spacing changes as the folds open. This is an arrangement diagram, not a paper-thickness simulation.
Then join
Start at D.
Work towards A.
- D
Sky / back
Turn tabs towards the front. Match to the final 8 mm at 112–120 mm on both strips.
- C
Hills / third face
Turn tabs towards the back. Match to 80–88 mm, keeping both top edges level.
- B
Leaves / second face
Turn tabs towards the back. Match to 40–48 mm. The leaves face the opening.
- A
Window / front
Turn tabs towards the back. Match to 0–8 mm. Check the view before the final join.
Dry-fit first. Keep adhesive inside the marked areas and away from creases. Set one pair of joins before moving to the next layer.
When it doesn’t sit right
The two sides twist
Before gluing, put both A ends beside the front frame and compare the crease directions from the printed sides. Use the top-view drawing to check the actual zigzag direction, rather than relying on how a loose strip is turned over. Refold the trial strip and level the tops of corresponding faces before joining.
A fold will not close
Look for adhesive crossing a crease, a tab on the wrong side of its letter, or a tab that was not folded at the edge of the face. Do not force a glued hinge. On your next trial, dry-fit the tabs and use less adhesive inside the grey zone.
The scene looks flat or hidden
Open both accordions evenly, then look through the centre of A. The dark leaves overlap part of the pale hills by design; the moon should remain visible above them. If you redraw a layer, check it over the other loose sheets before cutting: a high solid bank can hide the entire background.
This is an original digital pattern, not a physically assembled product sample. Printer feed, stock, scoring and glue can change the result; make the plain-paper trial first.
BEFORE DRAWING YOUR OWN LAYERS
Keep the moon in the opening.
A loose layer can look lovely and still hide the subject behind it. Use the outline sheets to make a flat overlap check before committing your drawing to cut paper.

Only the bank moved.
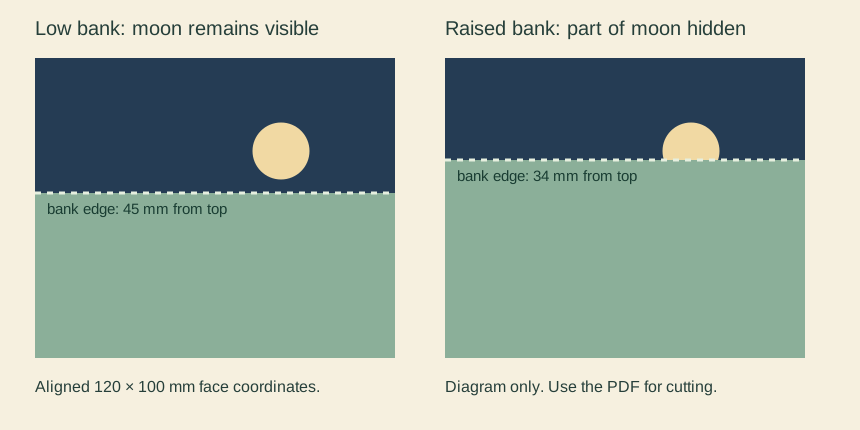
In the supplied sky artwork, the moon centre is 82 mm from the left and 31 mm from the top of a 120 × 100 mm face; its radius is 9.5 mm. Its lowest point is therefore 40.5 mm below the top.
The first practice overlay begins its solid bank at 45 mm, below the whole moon. The second one raises that boundary to 34 mm. In this aligned flat view, the bank now covers the moon from 34 to 40.5 mm. Making a larger moon on the rear sheet would change a second object instead of fixing the foreground decision.
Use an order you can undo.
- Place your uncut background D flat. Lay a rough tracing of the proposed C opening over it, lining up the outside rectangles.
- Add B's retained shapes, then A's window. Mark what disappears. The paper left in a window is the material that blocks the view.
- Move or lower the obstructing drawn edge while the pieces are still a proposal. Keep tabs, outer frames and required joins intact.
- Make a plain-paper dry fit at the intended opening depth. Look from the position where the finished scene will be viewed; a flat overlap is an early check, not the final view.
Keep important lettering on a single retained face. Splitting a word across two layers may align in one flat view and separate when the accordions open. If a detail must be seen from several angles, test those angles with the paper trial rather than assuming the straight-on diagram guarantees them.
Keep the flat sightline study · SVG ↓ · Return to the actual outline cutting sheets. The new study carries no glue zones or tabs; do not substitute it for the pattern.